
So, you have already decided to start a blog. That’s great, indeed!
Here is a detailed guide about how to start a blog in 2023.
A few years back, I was in the same court.
The best ever decision that I have made. I started my first blog in 2010. Now, I do handle multiple niche blogs successfully.
With that real-time experience, I believe I could help you in a better way to start your blogging career.
Let 2023 be the special year for you starting the first blog.
How To Start A Blog? Step-By-Step Beginner’s Guide
Starting a blog is not a challenging one. But, you need some guidance and tips to start a blog successfully. Indeed, ideas from the expert bloggers can help you save money, time and efforts investing in appropriate things.
The internet is overcrowded with information. You can’t try and test all the resources to pick something works for you.
So, take time to skim through the path travelled by other bloggers to learn from their mistakes and suggestions.
Instead of wasting your time in awful things, go with the proven solutions from scratch.
Today, with this guide, let’s start a blog for you.
[toc]
7 Easy Steps To Start A Blog In 2023
It is so simple to create a blog in this digital age. Make sure; you do follow these simple steps to start a blog that pays for it.
Step – 1: Choosing a profitable niche
Step – 2: Identify a suitable name for the blog and name it
Step – 3: Host your blog on a good webserver
Step – 4: Set up the blogging platform
Step – 5: Customize your blog using themes & plug-ins
Step – 6: Start posting content
Step – 7: Monetize the blog (Sometime later, not immediately)
So, we are almost about to explore the steps involved in starting a blog. But, before that –
Why you need a blog? Or why you should start a blog?
I hope you must have answers to these questions.
Only then, you can be a successful blogger. You need a strong purpose to blog on something.
Here are the common goals of the majority of the bloggers, so far.
[su_note note_color=”#e9faee”]
- Don’t like 9 to 5 white-collar job – When you don’t want to fit yourself into a regular job, start a blog. You are the BOSS. You are everything.
- You have things to share with others – When you want to express yourself on your interests to others, blogging must be the right platform. Take it on hand.
- You can help others with your ideas – If you are confident that you can solve other’s problems on any particular topics or niche, then blog about it.
- Making money for your living – You can make money through blogging monetizing it with various advertising and marketing strategies.
[/su_note]
I guess you must have one of the above reasons to start a blog in 2023. Good to see.
Without further ado, let’s build a blog for you!
Step – 1: Choosing A Profitable Niche
The word niche refers to the topic that your blog is going to deal about.
Indeed, the most significant task in starting your blog. Randomly choosing a topic and blogging about it would make less sense.
Instead, choosing a niche that you are passionate about will inspire you to blog consistently. Most of the drop-outs had chosen their niche that they are not much interested in.
Syed Balkhi says that finding a profitable niche is the key to build a successful blog.
It’s not enough to blog on something you’re passionate about. It must be a profitable niche too.
Here are things to consider while searching for a niche to blog –
You must enjoy talking about the topic
As I said above, most people lose their interest after blogging for a few months and give it up. It can either be your hobby, your work or about any product you recently bought and inspired. You must also like to learn and talk about that chosen topic.
How to find such an interesting topic that excites you? Let’s play a quick game. Take a pen and paper. Close your eyes and pen down the first 10 things that strike your mind. It can be anything like wall decoration, parenting, rock climbing, etc.
There must be a big market for the topic
Don’t just go by your passion. Make sure there is a high demand for content on that particular topic. Take a while to do some market research to find it out. Identify if this topic has a big audience and how competitive it is.
Using Google Trends, you can guess how this topic has got interests over time. Check out whether the market is stable, raising or declining.
For example, you can see the topic “portable car lifts” shoes declining graph, whereas the search term “small home office” shows a rising curve.
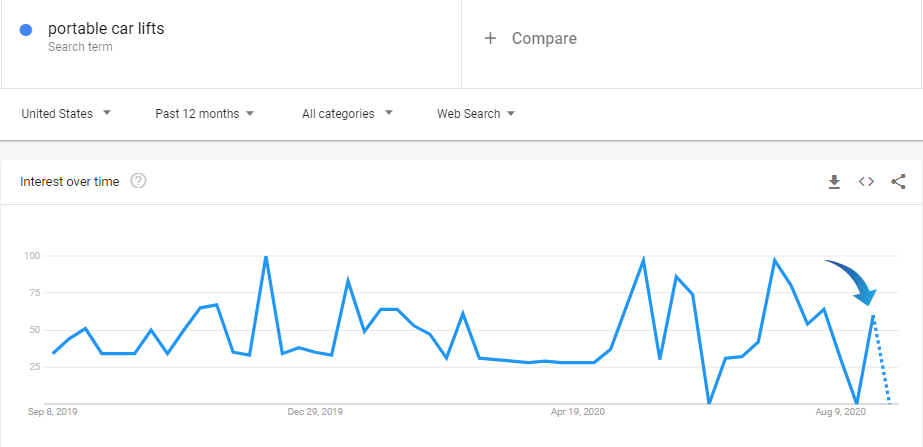
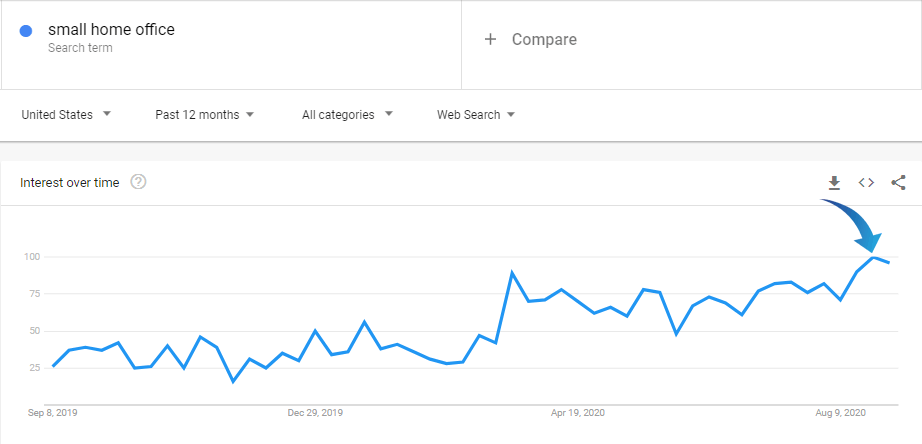
I had set the location to the United States. If you are unsure about the target location, keep it ‘worldwide’.
Let’s ignore the topics that are declining since our blog is going to be long-term.
It is super essential to define your target location and target audience before sticking to a certain niche.
Pick a smaller or micro-niche
The next big thing is to understand what level of competition the topic has. Search for the topic on Google and see how many results you get.
Choosing a broad niche, you have to compete with too many authority sites. To avoid that, let’s pick a smaller or micro-niche.
Refer to the related search terms on Google and use Google Keyword Planner to find a micro-niche term that has reasonable monthly search volume and low competition.
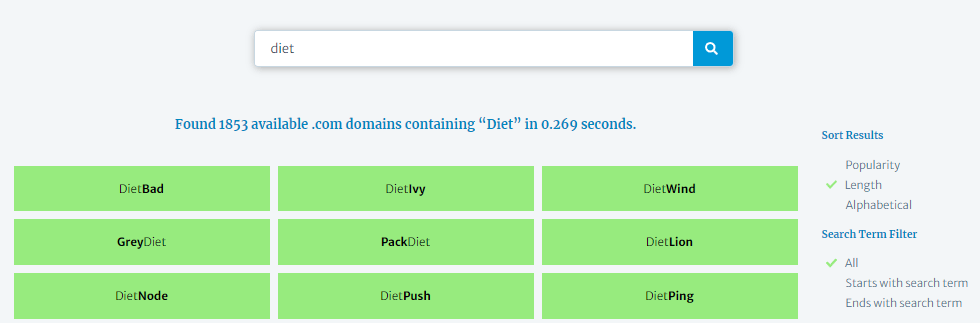
For example, instead of choosing a broad topic like ‘Diet’; go for ‘keto diet’ or ‘paleo diet’. You will have more inner topics to write about like keto diet recipes, keto diet menu, etc.
Make sure it’s profitable
Ask this question, can I make money from this niche? When you find a niche that you’re passionate about, others are interested in the topic, and it’s smaller, make sure it is profitable too.
Sometime later, you are supposed to make money from your blog. You can’t change the niche later after building the audience. So, before sticking to any particular topic, check how profitable the topic is.
See other blogs on the same topic to know how they make money.
Look at some popular products on Amazon related to your niche. Search for some other big affiliate programs on the topic and its related products.
Also, check if you can build your own product in a way or either.
Doing all these, you can decide how profitable the niche is.
The general formula, choose a passionate and profitable niche to build a long-term blog. With that, you are ready to move further.
Step – 2: Identify A Suitable Name For The Blog & Name It
Once you have a niche handy, naming your blog based on the chosen niche is simpler. If you have no idea about selecting a domain name for your blog, then I’ll help you.
The domain name is nothing but the word or set of phrases that explains about your blog topic.
For example, if you choose ‘keto diet’ as your blog niche, then the domain name can be like –
Diettogo, Healthydiet, etc. Even you can use broader terms like HealthifyMe, Healthline, etc. So, you can extend your micro-niche in future.
Here are some of the tips to have a remarkable domain name for your blog.
- Let it be brandable instead of generic
- Keep it short
- It must be easy to type and pronounce
- Avoid special characters and numbers
- Try to include some action verbs like go, do, take, etc.
- Use niche keywords in the domain name
- Prefer using TLD’s like .com, .net, etc.
You can also have a domain name under your name, like how Matthew Woodward, Robbie Richards, and Enstine Muki have.
To make your job even simpler, here is an idea. Head over to LeanDomainSearch and enter your niche topic or keyword.
You will get thousands of domain name suggestions, including the target keyword. Select a few that inspires you.
For registering the domain name for your name, it must be available. You will get to know before registering it via domain registrars.
But, last minute, you can’t search for another, if the particular domain name is not available for registration.
So, let’s check the availability right now.
Go to namecheckr website. Here, I use the term ‘gocrazydiet’. You can see the domain name is available in .com extension and most popular social platforms.

So, you are ready to go with your lovable domain name for your blog.
You can now register the domain name with any domain registrars. But please wait! You can have your domain name with the same provider who offers web hosting services too.
Step – 3: Host Your Blog On A Good Webserver
To make your blog live over the web and visible for the users, you need a domain and web hosting. The domain name, as we have seen above – the name is the name of the site or blog that readers use to search in the browser to reach you.
For a clear understanding, here is an example –
https:// – HyperText Transfer Protocol
www – World Wide Web
Traffic Crow – Domain name
.com – Domain extension (TLD – Top Level Domain)
You can have like this – https://www.gocrazydiet.com (This is just for an example)
The next significant thing in starting a blog is choosing a suitable web hosting solution. Hosting is nothing but storing your site files in a server so that it will be publicly available for users while browsing.
But, keep in mind; it’s not something like buying a hard disk or pen drive to store your files. Web hosting servers have a great role in deciding your blog performance. Meanwhile, your data must be safe.
But, there are plenty of hosting providers in the market? Which one to choose between?
How to choose a good hosting server for your blog? Don’t worry. I will help you with this.
Don’t break your mind. Simply choose SiteGround and experience blazing speed performance of your blog at greater costs.
I understand your hesitation. You can’t just go by my words.
We have proof.
Have a look at the improvement in our website’s speed after using SiteGround hosting servers.
{Image – SiteGround – Page loading speed)
When you want to achieve fast page loading with no much efforts, then SiteGround is ideal.
Not only me, but there are also an array of expert bloggers use and recommend SiteGround hosting for others.
[su_note note_color=”#e9faee”]
Harsh Agrawal – Shout Me Loud
From my own experience using Site Ground hosting, it claims to offer 99.99% uptime. There was only one downtime, that too for one minute. Then, I realized that they have server isolation technology on their shared servers also. With that, one affected site won’t affect other sites on the same server. So, I strongly suggest even its shared hosting for beginners for top-notch security and irresistible performance.
Brad Smith – Hosting Facts
SiteGround hosting ranks almost top of all other web hosting services – in both the speed and uptime standpoint. It provides tons of extra features that are ideal for both beginners and pro users. Monitoring SiteGround for over two years, we never had any major issues with their customer support.
Joost De Valk – Yoast SEO
While keeping track of various hosts that get a lot of support requests, we find it hard to find SiteGround in the list. That realizes SiteGround had very few complaints from its customers than other hosting companies.
[/su_note]
So, you may confidently go with the SiteGround hosting. You will never get wrong choosing it.
Still, you can choose other hosting servers that offer free domain name or any other exciting offers to impress first time users. Despite those offers and small savings on the domain name, I strongly recommend SiteGround for its speed, uptime and support for any long-term blogs.
Being said that, I’ll also take you through the process of purchasing SiteGround shared hosting and registering the domain name of your blog.
Step – 1: Here is the special link to get started. You will explore the variety of hosting services that SiteGround offers like web hosting, WordPress hosting, WooCommerce hosting and cloud hosting. To start a blog, shared web hosting will be more than enough, probably.

Step – 2: Click on “Get Started” under web hosting service. Go with the StartUp plan. That is quite affordable with an essential set of features for beginners.

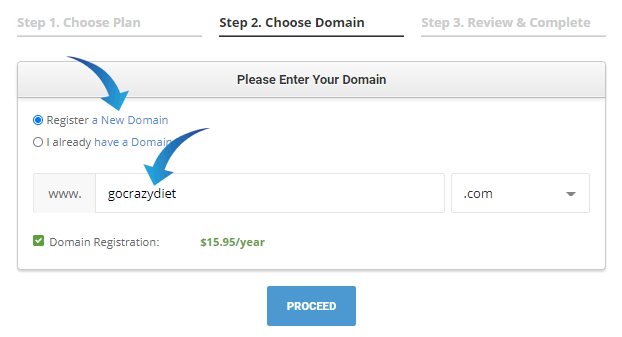
Step – 3: In the next window, enable ‘Register a new domain’ option and enter the chosen domain name.
Note: I have used this gocrazydiet.com domain just to explain the check-out process. Similarly, you can have your own domain name like anything.
Click on ‘Proceed’. In case of registering the domain name with another registrar, then choose ‘I already have a domain’ and enter it.
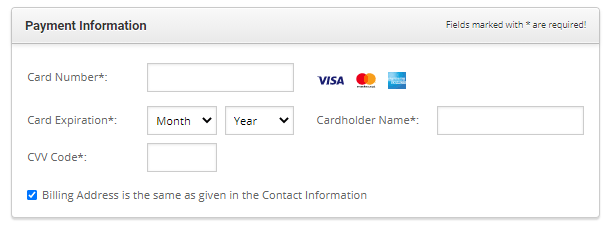
Step – 4: Fill out the essential account information.

Step – 5: Enter your credit or debit card details to make payment and own the domain and hosting.
Step – 6: Then, in the purchase summary, choose the period like 12 or 24 or 36 months. As much as longer period you choose, the cost will be low. Anyways, it’s good to start with 12 months.
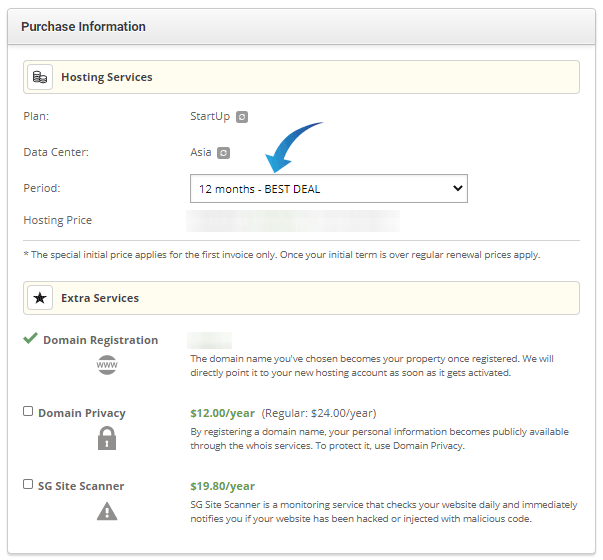
Step – 7: Under Extra Services, the domain registration is enabled since in the previous window we opt for. The other two services, like Domain Privacy and SG Site Scanner, are optional. You don’t require it right now, probably. Leave those checkboxes, unchecked.
Step – 8: Accept the terms and conditions. Pay now.
Just for a few minutes for the SiteGround to process your requests. Soon, you will receive an email from SiteGround team with the necessary account details.
Now you have purchased the domain name and server space/hosting for your first blog. Great! You own a blog now. But, you’re job is not done completely yet.
You will have to set up your blog for the audience.
Step – 4: Set Up The Blogging Platform
Now, it’s time to decide upon the platform to build or design your blog. No second choice – WordPress is always ultimate for creating blogs.
Though there are plenty of CMS platforms in the market, WordPress powers the majority of the websites over the web, its unlimited customization options, hundreds and thousands of themes and plug-ins make WordPress a favorite choice for most of the webmasters. Let’s go with them.
Login to your SiteGround hosting account with the details you had given while purchasing or credentials you have received through email from SiteGround.
Then, choose WordPress to install to set up your new site or blog. After that, feed some login details to take it further. These details you will require later to log in your website’s WordPress dashboard.
You are done with WordPress blog setup. It doesn’t take more than a few minutes to install WordPress for your blog.
From the SiteGround dashboard, you can choose Go To Admin Panel to visit the blog’s WordPress admin page. Alternatively, you can directly use this URL https://domainname.com/wp-admin to login to your WordPress dashboard.
To log in, use the login credentials you had given while installing WordPress to your blog. You will now land on your blog’s WordPress dashboard.
Make sure to change your WordPress login URL soon after. By default, it will be https://domainname.com/wp-admin. Make it unique, replacing ‘wp-admin’ with custom words like admin, login, etc.
Then, keep your WordPress admin password strong so that no one could guess it.
Now, you have your blog online. Visit your blog entering its URL on to the browser to see its appearance. Indeed, it will look simple and plain with no enhancements. In the next section, let’s see how to bring it life.
Step – 5: Customize Your Blog Using Themes & Plug-ins
To change your blog’s look and appearance completely, let’s install an impressive theme. You can design your blog based on your niche too.
WordPress has thousands of free and premium responsive themes. In my opinion, the free theme would be good enough to start with. Even there are plenty of responsive, fast-loading, SEO-friendly themes available in the WordPress repository.
Indeed, it’s hard to pick one particular theme among the array of good themes. Like how hosting servers have a key role in deciding your blog loading speed and performance, themes will have the same impact.
For the easy go, let me suggest you a free WordPress theme that is multi-purpose, performance-focused, responsive, fast-loading, easy-to-customize and SEO-friendly. It’s none other than the GeneratePress themes.
If you are blank choosing a WordPress theme for your blog, keep these things in mind –
- It must be light-weight and easy-to-customize.
- Most of all, WordPress themes are responsive. Make sure the one you choose is responsive and compatible with your latest WordPress version.
- Check how often the theme gets updated. When was it recently updated?
- Any theme must have proper documentation and provide good customer support.
With these general hints, you are likely to choose the suitable theme for your blog.
Here are some of my most favorite WordPress themes for your reference. Instead of testing more themes, you can choose anyone between these hands-picked WordPress themes.
Astra Pro
The most light-weight theme (less than 30kb) that comes with an extensive set of features and customization options. Using it with any page builders like Elementor or Beaver Builder, you can design an awesome home page.
Genesis Themes
The Genesis theme is a performance-centric framework built with air-tight security features. Clean coded, light-weight and highly customizable theme options.
GeneratePress
I use GeneratePress on multiple blogs and highly recommend GeneratePress for others too. Even beginners who don’t have any designing skills can customize the theme as they need. With amazing speed and excellent support, GeneratePress is popular among bloggers.
So, just pick a theme from the above and explore its features.
How to install and activate the theme to your blog? It’s so simple.
Log in to your WordPress dashboard. Go to Appearance and then Themes.

You will already have default themes. Click on ‘Add New’ and then ‘Upload Theme’. Upload your theme zip file, install and activate it.
You have installed your favorite WordPress theme to your blog. To give unique look and sleek design to your blog, customize the theme as you need. The free WordPress themes would come with limited customizing options, whereas the paid themes will let you customize it to any extend. You can modify every edge of your blog without even altering the theme code.
Go to Appearance à Customize. Each theme will have different features and options to tweak it and customize the site. But, choosing from any of the above WordPress themes, you will find no hassle in designing your blog.
Pro-tip: For any cost, don’t go for nulled or pirated themes. Some people sell such pirated copy of the premium themes in the market. You can get those themes at a cheaper cost. But, you will lack essential customer support and documentation whenever you require. Higher security vulnerabilities are using such nulled themes since hackers are likely to inject spam codes into the theme code to hack websites. Don’t put your blog into risk.
Next, for added functionalities, you can install various plug-ins to your WordPress blog. Here are some of the essential WordPress plug-ins.
Keep in mind; installing too much of plug-ins could make your site overloaded and affect its loading speed. So, install the essential plug-ins only.
Here is the list of favorite plug-ins –
Really Simple SSL – While looking at the SiteGround hosting plan, you can see free SSL. It is nothing but the certificate to notify that your site handles and transacts data in an encrypted mode. That is, your site if safe to access by its users. Install and activate this plug-in to make it https instead of http.
WP Forms – the essential plug-in to embed forms into your blog’s contact page, etc. With drag-and-drop editor and pre-made templates, designing responsive and mobile-responsive contact forms made easier.
Autoptimize – the caching plug-in to improve your blog’s performance with actions like minify cache, JS, CSS etc. don’t dig deep into these terms and get confused.
RankMath – obviously, you have to optimize your blog pages to rank in the search engines. This SEO plug-in helps you with suggestions to optimize the on-page factors of your pages and posts.
Table of Content Plus – the plug-in to include content index or table of content into your content to improve the readability.
Shortcodes Ultimate – this plug-in allows you to use plenty of visual components like buttons, note, highlights, space, quotes, etc. to improve the user experience of your pages.
All-in-one Schema Rich Snippets – When your page appears in the SERP’s, you can display more information to the users for more click through rates. This free plug-in helps you to add details like rating, review, working hours, recipes, etc. that appears to highlight things.
CAOS for Analytics – this plug-in is to incorporate Google Analytics to your blog. Doing so, you can track the traffic, demographics, sessions, bounce rate, and even more analytics about your blog.
Social Warfare – using this plug-in, you can display social sharing buttons on your blog pages so that users will find it easy to share your posts on their social profiles instantly.
Akismet Anti-spam – this plug-in is super essential to block spam comments and contact form submissions to protect your site from malicious content.
Some of the paid or premium plug-ins that may nt be required for start-up blogs –
WP Rocket – the better alternative to Autoptimize caching plug-in.
Thrive Architect – page builder to design amazing home page or landing pages for your blog.
WP Rich Snippet – the alternative to All-in-one rich schema snippets plug-in.
It’s good enough to have free plug-ins for now.
Go to WP dashboard and click on ‘Plug-ins’. Click on ‘Add New’. Search for the plug-in and install it. Activate the installed plug-in.
Before installing any new plug-in, make sure the plug-in has got good ratings and more installations.
Again, don’t ever use any cracked plug-ins since that’s the easy ways hackers would find a way to steal your blog data.
Finally, you have your blog customized and optimized with added functionalities.
Step – 6: Start Posting Content
The real game starts here. All you have done above is a one-time job. All set.
Now you have to contribute content to your blog. First thing, write a few pages that are mandatory for any blog or website.
It includes home page, about us, contact us, and privacy policy. Select ‘Pages’ from the WordPress dashboard. Then, write and publish new pages.
Further, let’s add some new posts to your blog.
For creating a blog post, go to Dashboard –> Posts –> Add New.
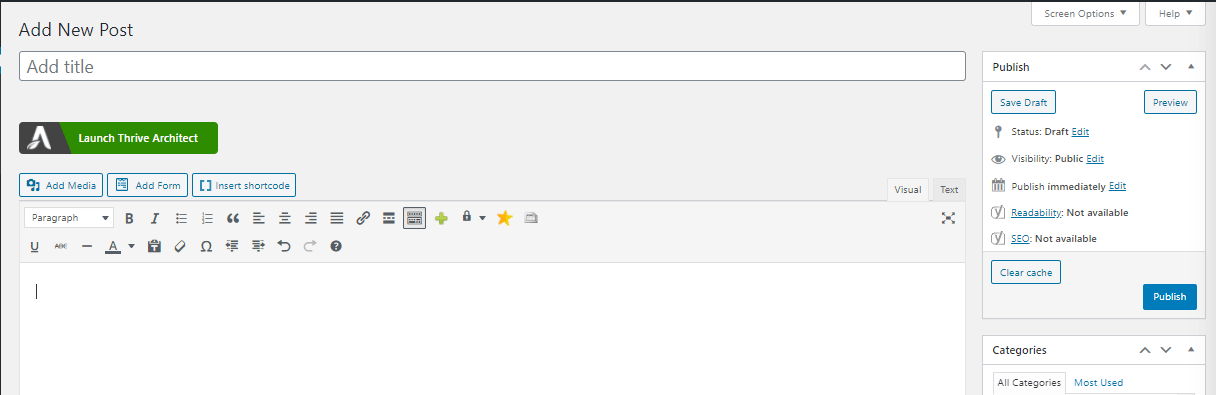
Start writing your first blog post. Find some exciting topics related to your niche. Here are some of the tips to create an epic blog post. Some SEO tools like SEO PowerSuite, SEMRush, Ahrefs and Serpstat would greatly help on these tasks.
- There are plenty of keyword research tools available. Using any of those keyword tools, do some basic research and find a long-tail keyword that has decent monthly search volume and low competition. Initially, it’s good to target keywords with easy-to-rank keywords.
- Get some related or LSI keywords from Google related searches or Google auto search suggestions. Including those keywords can boost your ranking possibilities.
- Keep your post titles eye-catchy using some power words.
- Write as much as a lengthy and valuable article to gain readers attention.
- Make sure to optimize the on-page factors. However, using plug-ins like Yoast or RankMath will help you with this.
- Include images to make your content more explanatory and engaging. Make sure your writing is interactive.
- Create a category and tag it appropriately.
- Make sure you have set the proper URL structure and keep permalinks short.
Hope, with these ideas, you can somehow draft and publish your first blog post successfully. Keep doing it to attract more audience!
FAQ About How To Start A Blog
Still, you might have some questions about starting a blog in 2023. Hence, I take responsiblity to answer some of the common questions from startups and blogging beginners. Hope you must have the same set of questions in your mind. Get it cleared now. Nothing can hold you back from building a blog today.
How to start a blog for free?
Yes, you can start a blog not even investing a single penny. There are platforms like blogger.com, blogspot.com, etc. to encourage those interests. But, if you really blog for a long-term, then I would recommend you to spend a little money and prefer purchased hosting and custom domain.
How to start a blog and get traffic?
Starting a blog is a one-time job, but promoting it and driving traffic is a routine. You must be consistent in posting valuable articles that solve problems of your target audience to drive more organic traffic.
How much it would cost to start a blog in 2023?
Roughly, it would cost you around $3 a month for hosting and $15 for domain name for an year.
How to start a blog business?
There is no much efforts involved in converting your blog as a business. As you start building audience, you can moneitze your blog to make it as your business.
Final Words About How To Start A Blog 2023
Finally, you have successfully started your own blog. I’m glad that I could help you build your blogging career. Treat your blog as a business and be consistent in offering values to the readers.
Keep user’s need in mind and create content that matches user’s search intent. Only then, you could tract user’s attention and solve their problems.
Once you are starting growing your blog scale, your hosting plans as and when required. Also, never hesitate to invest in money to extend your blog exposure. Not immediately, but try to improve your blog design, performance, functionality, and value gradually over time.
Blogging is your profession now! Congrats! Keep rocking!
Thank you for sharing such a detailed post with each and every minute details, it will help beginners like us to easily handle and create new blogs if needed.